
Sometime in the 90s, focaccia suddenly became a big deal in Australian cafes. The flavoursome, slightly spongy bread is a great conduit for a range of flavours and the bread itself can be made with myriad variations. I remember feeling very sophisticated as a university student when I’d order focaccia for lunch, along with a black coffee.
But even though I’ve munched my way through swathes of focaccia at cafes around the world, I’d never made it myself until yesterday. During the pandemic, I have jumped on other bread-related baking bandwagons. I’ve created three variations on banana bread with a Snickers bar-inspired calorific load of ludicrousness, a cinnamon swirl banana bread and a bejewelled almond banana bread. I’ve made a few loaves of bread with varying degrees of success, from a Turkish bread that reminded me of the cafe underneath my old office in Sydney through to a supposedly foolproof loaf that exploded inside my oven because the tin was too small.
I was never going to be self-sufficient in bread over lockdown – I’m more of a get-a-seeded-loaf-on-special-and-bung-it-in-the-freezer kinda girl. But yesterday I spotted some focaccia fun on my friend Lou Lou’s Facebook page – stunning homemade focaccia decorated with vegetables to look like spring flowers. It was festive and fun and looked eminently doable.
So I did my research. One of my old stand-by cookbooks, the Australian Women’s Weekly Traditional Italian cookbook, offered me some handy clues for putting the focaccia bread base together. Naturally, I strayed from the recipe with all the loyalty of Boris Johnson to a blonde and accidentally used self-raising flour instead of plain. I only realised this blunder as I was cleaning up the kitchen while waiting for the dough to proof and I was terrified I was going to end up with a focaccia the size of Texas. But this brain fart turned into a blessing – I remember my Pizza Hut dough training and figured if I reduced the proofing time, I could probably get away with this. As a bonus, it meant the focaccia would be ready a little sooner.
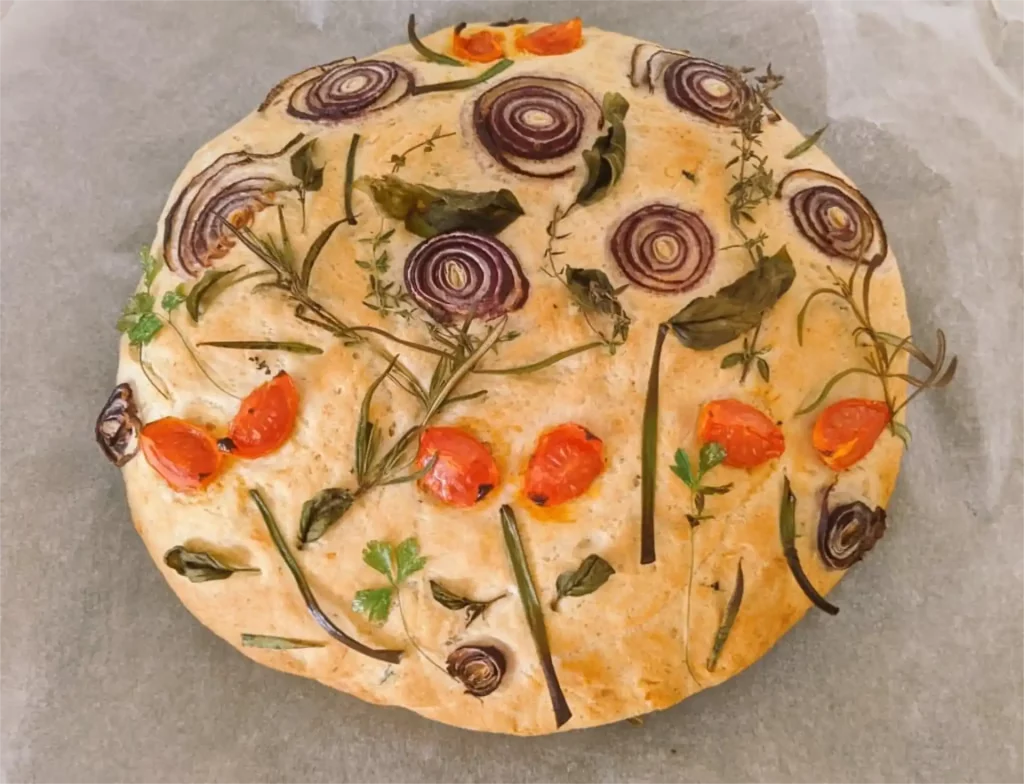
As for the decoration of the focaccia, this floral fiesta is a great way to use up herbs, red onions, peppers, carrots, tomatoes – pretty much anything that can be sliced thinly and fashioned into flowery designs works here. So I haven’t been prescriptive with the toppings – this is your chance to be creative and make a unique crowd-pleaser. If the response on my Facebook page is any indication, I am pretty sure I’ll be making floral focaccia for plenty of houseguests in the months ahead.
And for those who are gluten-free, click here for the recipe that my friend Lou Lou used for her spectacular focaccia.
Here is a picture of mine before it went into the oven:

And here are the before and after pictures for the spectacular gluten-free floral focaccia that Lou Lou made:


Floral focaccia
Ingredients
375g (2.5 metric cups) self-raising flour
7g sachet of dried yeast
30g grated parmesan
2 tablespoons of chopped or dried sage
3 teaspoons salt
250ml (1 metric cup) warm water
60ml (1.4 metric cup) olive oil
Vegetables and herbs to decorate – I used red onion, cherry tomatoes, fresh parsley, fresh onion chives, fresh thyme and fresh basil, but the only limit here is your imagination and whatever you can get your hands on. Do not be afraid to experiment.
Instructions
- Sift the flour into a large bowl and mix through the yeast, parmesan, sage and a teaspoon of the salt.
- Using a mixer with dough hooks or a wooden spoon, gradually add the warm water and three tablespoons of the olive oil.
- You will probably find that even with a lot of mixing, there will still be a few crumbly bits at the bottom of the bowl. Do not panic – this is where the kneading comes in. Turn the main mass of dough onto a floured surface in a nice big blob. Sprinkle any crumbly bits into the middle of the blob and knead for about 10 minutes. You will find the dough becomes smooth, more elastic and the crumbly bits will be incorporated beneath your very fingers.
- Once you’ve finished kneading, grease a baking sheet and place a piece of greaseproof paper on top. Put the kneaded dough in the middle and fashion into a circle about 3cm high and 25cm across.
- Wrap the dough in oiled clingfilm and put it in a warm spot to proof for half an hour. With the addition of self-raising flour, this should be plenty of time for it to increase in size and for pleasing bubbles to form.
- While the dough is proofing, prepare your vegetables and herbs for the decoration. Slice vegetables such as onions, leeks or carrots finely, peppers can be used to create flower shapes and petals, cherry tomatoes can be cut in halves or quarters to form petals. Fresh herbs and onion chives work well as stems for the vegetable flowers.
- After half an hour, remove the dough from the warm spot, remove the clingfilm, and pre-heat the oven to 200 degrees Celsius.
- If the dough has changed shape during proofing, use clean hands to fashion it into a circle. Mix the remaining olive oil and salt and brush onto the top. Arrange the vegetables and herbs in the desired pattern. Gently squish the decorations into the dough so they stick but take care not to plunge them right into the dough so they disappear.
- Bake for 20-25 minutes, until the surface of the focaccia is golden-brown. It can be enjoyed hot fresh from the oven or eaten cool.